Know Your Light Source: The Key to Portrait Photography
- Irierootsini

- Aug 26, 2021
- 4 min read
Updated: Aug 30, 2025

Even though there are several key factors in creating a great portrait, the one tip I can share that can be summed up in four words is: “Know Your Light Source.” Whether you are working with ambient lighting, studio lighting, or both, it's vital to understand how you want the light to wrap around your subject. I believe there's a perfect light source for every portrait that will complement your subject and help create the image you desire

Working with Ambient Light
If you like working with ambient lighting, know how to position your subject in relation to the light source. In an outdoor setting, being aware of where the sun is will help determine how to place yourI subjects. Scheduling your portrait session in the early morning or late afternoon, when the sunlight is not directly overhead, usually produces the best results. It also helps to shoot on an overcast day rather than a cloudless one.
Many photographers prefer cloudy conditions because they provide more flexibility. Instead of constantly searching for shade or relying on a scrim to diffuse harsh light, the cloud-covered sun acts like a gigantic softbox. This softens your images and reduces the amount of post-production work you will need to do in programs such as Lightroom, Capture One, or Photoshop.
One of my favourite approaches is to backlight the subject. This is done by positioning them between the camera and the light source. A good example of this is the portrait of a couple on the upper left, where the sunlight separates them from the background and gives emphasis to the subjects. Reflectors or even portable off-camera flash with a modifier can also be used to complement your subjects (see sample photos below). We will explore those in more detail later.


Ambient light portraits taken in the morning sun, using reflectors or portable off-camera flash with modifiers to complement the subjects, with a soft bokeh background
Working with Studio Light
If you enjoy working with studio lighting, learn how to position your light sources by understanding the different modifiers and equipment available. One key rule in using studio lights for portraits is knowing the Inverse Square Law, which explains how light falls off with distance. Mastering this principle helps you shape light on your subject more effectively.
Once you understand the Inverse Square Law and know how to adjust your lights properly for exposure, you can begin shaping your light source with different modifiers such as softboxes, umbrellas, snoot. You can also introduce reflectors, scrims, v-flats) near your subject to refine the effect.
To make this process more accurate and reduce guesswork, investing in a light meter is highly recommended. A tool like the Sekonic Flashmate L-308X helps ensure precise exposure settings and eliminates much of the trial and error in flash photography. For portrait photographers working with studio lights, a light meter is an essential piece of gear.
Below are samples of my past work showing how studio lights can complement the subject in particular poses. Notice how I positioned the lights with different modifiers to enhance my clients’ portraits. Feel free to click on the images and decide for yourself if the lighting choices improved the results.


Actor in different poses with varied studio lighting setups, each designed to give depth and impact to the final image.


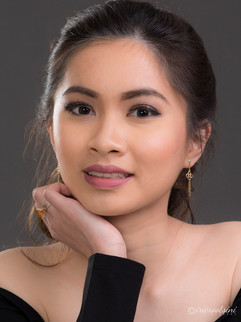
Studio portraits using modifiers, reflectors, or scrims to complement the subjects across beauty, business, and lifestyle poses.
Mixing Ambient and Studio Light
If you enjoy working with both, that means you have gained confidence with ambient light and studio setups. The next step is to learn how to mix the two to create environmental portraits. This takes practice, with a fair amount of trial and error, and there will always be some hits and misses as part of the learning process. To eliminate much of the guesswork, you can use a light meter, which helps ensure accurate exposures when working with multiple light sources.
For the image on the left below, the concept was based on a Beauty and the Beast theme. The red rose you see was intentionally planted among the vegetation to appear as if it were naturally part of the setting. The lighting setup included a kicker light to create a subtle backlit effect, paired with a key light positioned at camera right.
The image on the right was taken at dusk with a three-light setup. A speedlite inside the glowing sphere acted as the key light, a portable flash served as a backlit kicker, and a portable studio light with an octagon softbox was mounted on a c-stand for fill. The entire setup was carefully prepared in advance. Once everything was ready, I asked the subject to step into position, triggered the lights, and captured the natural reaction a moment later. A little post-production adjustment was applied to give the final image the appearance of being taken at night.
Most professional photographers would agree that the only way to improve is to practice. Apply what you know, do not be afraid to experiment, and remember that photography is an art. As an artist, you will continue to grow through practice.


See what careful planning, creative lighting setups, and post-production adjustments can achieve in the final portraits.
Final Thoughts on Portrait Photography Lighting
Mastering portrait photography lighting is about knowing how to work with ambient, studio, or mixed setups to bring out the best in your subject. By applying the techniques shared in this post, you’ll not only improve your portraits but also gain the confidence to experiment with light creatively.


Comments